Appearance
场景图/层级树/节点树
接上篇三维透视投影,本来打算紧接着介绍三维相机的概念。但是在三维相机中运动到了一些关于坐标系变换的知识。所以,今天我们先来了解一下“场景图”的相关概念和知识吧!
引入
为什么我们需要引入场景图的概念?之前我们提到过:
当前我们所有的坐标都是处于同一坐标系中。我们就把这个坐标系称之为“世界”。所以现在我们所有的坐标都是“世界坐标”。
假设现在有这样的一种场景:我们想要描绘太阳系中各个行星的运动。众所周知,我们的行星不仅仅有自转,还有公转,甚至有的行星还有卫星。此时,如果我们还是只有一套简单的坐标系统,明显是很难以去描述各个行星之间的关系。所以我们引入了场景图这套系统。
概念
“场景图/层级树/节点树”是一种 N 叉树的数据结构,它用于表示多个物体之间的关系。
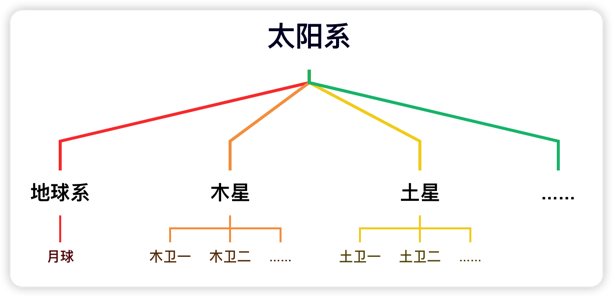
我们可以用树形结构图来表示上面提到的太阳系系统。

有了场景图这套系统后,我们可以很轻松的描述类似于月亮绕着地球公转的这类问题。虽然地球同时在绕着太阳转,我们不需要关心月亮是如何绕着太阳转的,我们只需要关心月亮是如何绕着地球转的即可。
要深入理解场景图,我们要先理解几个概念:本地坐标/局部坐标、世界坐标
坐标系统
我们在描述一个物体的位置和姿态时,通常我们需要这三个信息:位移、旋转、缩放。首先我们要搞懂的是:这三个信息是指的相对于谁的位置?旋转和缩放?
当然是相对于它的“父亲”坐标系而言的。我们在对一个物体进行平移、旋转和缩放时,也可以理解为是在平移、旋转、缩放物体所在的局部坐标系,或者说是模型空间。

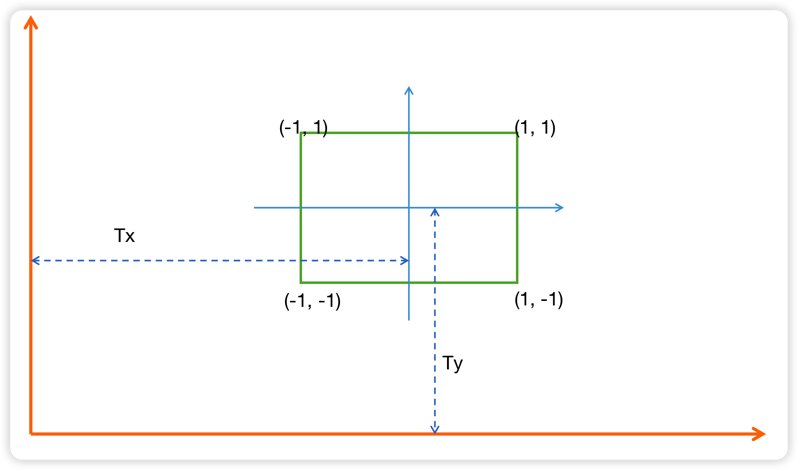
如上图所示,我们在绘制一个矩形的时候,我们各个顶点的位置都是相对于矩形的“中心”来确定的。通过这个中心建立的坐标系,就是所谓的模型空间(局部坐标系)。
当我们把这个矩形放置在另一个空间中(父级空间),此时,这个矩形相对于父级空间的坐标系中心,就拥有了所谓的位移。

在仿射变换一文中,我们了解到,我们可以通过矩阵乘以一个坐标,来对这个坐标进行平移、旋转和缩放的操作
所以我们可以使用该矩阵所在父级坐标系中的位置、旋转、缩放信息来构建一个矩阵。然后使用这个矩阵乘以模型空间中顶点的位置,就可以得到这些顶点在该父级空间中的坐标了。
如果该父级空间之上还有父级空间,那么我们可以用该矩形所在父级的父级空间的位置、旋转、缩放信息构建矩阵。再乘上刚刚得到的矩形所在父级空间的位置。这里用文字表述起来有点绕,我们写作公式:
我们可以看出来,这是一个递归的关系。如果我们想得到一个顶点在“世界”空间的坐标,就可以一直乘以其父级的变换矩阵,直到没有父级空间为止。
所谓的世界坐标就是处于最顶层坐标系中的坐标,最顶层的坐标系不存在父级坐标系了。
编码
现在我们可以把我们的场景图在代码中抽象一番。我们假设场景中的每一个对象都是一个 Node,Node具有一个物体的基本属性:包括位移(translate)、旋转(rotation)、缩放(scale)。另外Node 具有一个本地矩阵和世界矩阵(世界矩阵的作用主要是为了加快运算,这样我们不用每次都去递归的计算世界变换矩阵)。
ts
export class Node {
    private _localMatrix: mat4 = mat4.create();
    private _worldMatrix: mat4 = mat4.create();
    private _x: number = 0;
    private _y: number = 0;
    private _rotation: number = 0;
    private _scale: number = 1;

    private _parent: Node = null!;

    private _children: Node[] = [];
    constructor(public name: string, position?: vec3, rotation?: number) {
        if (position) {
            this._x = position[0];
            this._y = position[1];
        }
        if (rotation) {
            this._rotation = rotation;
        }
        this.updateLocalMatrix();
    }
    public get parent(): Node {
        return this._parent;
    }

    public get children(): Node[] {
        return this._children;
    }

    public get x(): number {
        return this._x;
    }

    public get y(): number {
        return this._y;
    }

    public get rotation(): number {
        return this._rotation;
    }

    public get scale(): number {
        return this._scale;
    }

    public set x(v: number) {
        this._x = v;
        this.updateLocalMatrix();
        this._children.forEach(child => {
            child.updateWorldMatrix(this._worldMatrix);
        });
    }

    public set y(v: number) {
        this._y = v;
        this.updateLocalMatrix();
        this._children.forEach(child => {
            child.updateWorldMatrix(this._worldMatrix);
        });
    }

    public set rotation(v: number) {
        this._rotation = v;
        this.updateLocalMatrix();
        this._children.forEach(child => {
            child.updateWorldMatrix(this._worldMatrix);
        });
    }

    public set scale(v: number) {
        this._scale = v;
        this.updateLocalMatrix();
        this._children.forEach(child => {
            child.updateWorldMatrix(this._worldMatrix);
        });
    }

    public get worldMatrix(): mat4 {
        return this._worldMatrix;
    }

    public addChild(child: Node) {
        this.children.push(child);
        child._parent = this;
        child.updateWorldMatrix(this._worldMatrix);
    }

    private updateLocalMatrix(): void {
        mat4.identity(this._localMatrix);
        mat4.translate(this._localMatrix, this._localMatrix, [
            this._x,
            this._y,
            0,
        ]);
        const rad = (this._rotation / 180) * Math.PI;
        mat4.rotateZ(this._localMatrix, this._localMatrix, rad);
        mat4.scale(this._localMatrix, this._localMatrix, [
            this._scale,
            this._scale,
            this._scale,
        ]);
        if (this._parent) {
            mat4.multiply(
                this._worldMatrix,
                this.parent._worldMatrix,
                this._localMatrix
            );
        } else {
            mat4.copy(this._worldMatrix, this._localMatrix);
        }
    }

    private updateWorldMatrix(parentMatrix?: mat4): void {
        if (parentMatrix) {
            mat4.multiply(this._worldMatrix, parentMatrix, this._localMatrix);
        } else {
            mat4.copy(this._worldMatrix, this._localMatrix);
        }

        const worldMatrix = this._worldMatrix;
        this._children.forEach(child => {
            child.updateWorldMatrix(worldMatrix);
        });
    }

    public getWorldPos(): vec3 {
        const pos = vec3.fromValues(0, 0, 0.0);
        const result = vec3.create();
        vec3.transformMat4(result, pos, this._worldMatrix);
        return result;
    }
}我们如何使用这个类呢?如下,我们分别创建根节点(root),太阳(sun),地球(earth),地球轨道(earthOrbit),月亮(moon)。然后使用 addChild API 来绑定它们之间的父子关系即可。
ts
const root = new Node('root', [0, 0, 0], 0);
const sun = new Node('sun', [0, 0, 0]);
const earthOrbit = new Node('earth-orbit', [150, 0, 0], 90);
const earth = new Node('earth', [0, 0, 0]);
const moon = new Node('moon', [50, 0, 0]);

root.addChild(sun);
sun.addChild(earthOrbit);
earthOrbit.addChild(earth);
earthOrbit.addChild(moon);在最终渲染这几个物体时,我们可以通过 getWorldPos这个 API 来获取每个物体在世界坐标系中的真实位置进行渲染。(如何进行渲染,这取决于你,在本例中,使用 canvas2D 进行一个简单的渲染实例说明)
总结
以上就是关于场景图的知识。其重点在于:
- 区分局部坐标系,或者叫本地坐标系或模型空间等,和世界坐标系/世界空间坐标的区别
- 使用矩阵变换将一个空间中的坐标转换到另一个空间中。
理解了以上两点以后,就可以说你已经掌握了关于场景图的知识了!接下来,让我们进入到关于相机的知识讲解。
如果觉得本文有用,可以请作者喝杯咖啡~

