Appearance
相机
前言
什么是相机?相机是在 3D 开发中非常常见也是非常重要的一个概念。相机代表我们的观察者的视角。还记得我们之前介绍的 三维正交投影和 三维透视投影吗? 相机其实指的是 观察者空间 + 投影变换 这两件事。
动机
那为什么我们需要相机?相机的作用是什么?我们观察一下下面的两张图
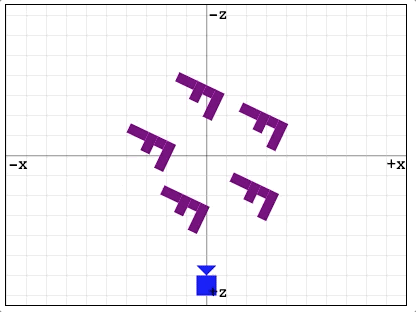
- 旋转摄像机,让摄像机绕着原点顺时针旋转。
- 旋转场景中的物体,让所有物体绕着原点逆时针。
事实上,无论是摄像机绕原点顺时针旋转还是场景中的物体绕原点逆时针旋转,我们以摄像机的视角来看的话,你会发现这两种方式看到的图像是一样的。
但是,移动摄像机比起整体移动场景来说更加的高效且更加的符号人类的生活常识。毕竟我们在生活中想要观察不同的物体时我们会去改变我们观察的位置和角度,而不会去移动物体本身,况且有的东西也根本无法移动(笑)。
How to do
那么我们如何描述这样的一件事呢?我们在开篇中说了相机的本质其实是 一个 观察者空间 + 投影变换。那么这是两件事:
- 首先,相机本身是具有一个坐标系,我们称其为“观察空间”
- 相机合并了我们之前提高的投影变换,它可能是正交投影,也可能是透视投影。
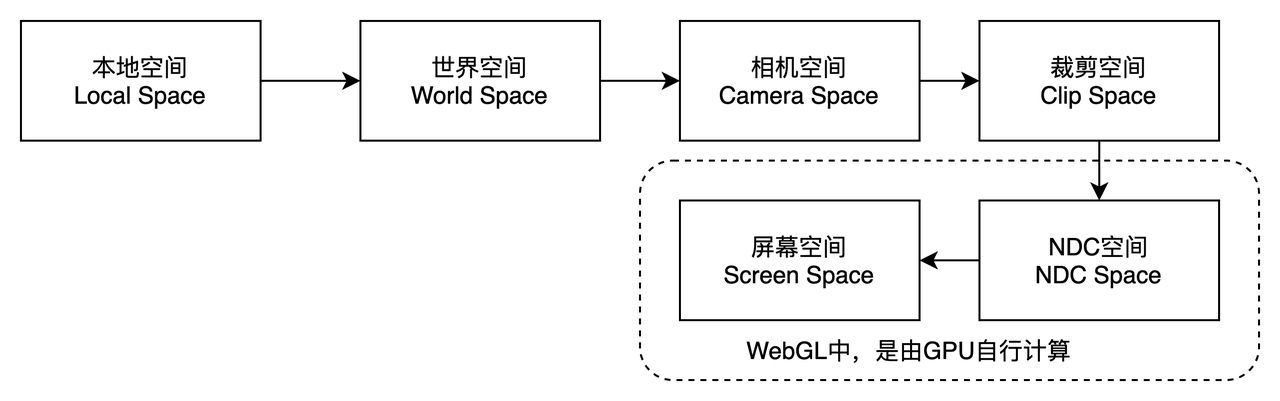
所以,我们引入相机后,我们需要把物体的坐标从模型空间转换到世界空间再转换到观察空间,最后通过投影变换到 NDC 空间。如下图所示。
那么,接下来我们看一下数学上的表示。在上一节场景图中我们学习到,将一个坐标变换到另一个坐标系中,就用当前坐标系在父级坐标系中的矩阵乘以当前坐标系中的坐标。
假设,我们现在在观察空间中有一点:,观察空间在世界空间中的变换矩阵为 我们将其变换到世界空间中的点 写作:
我们可以根据矩阵的运算法则,在等式的两边乘以变换矩阵的逆矩阵
所以将一个世界空间中的坐标转换到观察空间中,我们需要给这个世界坐标乘以观察空间的变换矩阵的逆矩阵!
在 GLSL 中,我们可以写作:
glsl
attribute vec4 a_position;
uniform mat4 u_translate;
uniform mat4 u_rotate;
uniform mat4 u_scale;
uniform mat4 u_world;
uniform mat4 u_viewInv;
uniform mat4 u_proj;
void main () {
    // gl_Position = u_proj * u_translate * u_rotate * u_scale * a_position; [!code --]
    gl_Position = u_proj * u_viewInv * u_world * a_position;
}我们可以看到,我们移除了之前的u_translate, u_rotate, u_scale这三个矩阵,我们用一个世界矩阵 u_world取而代之。另外还增加了一个 u_viewInv表示观察空间的逆矩阵。
我们以三维透视投影中的代码为基础,修改其中的render关键代码如下:
ts
const cameraMat = mat4.create();

const worldMat = mat4.create();

const render = () => {
    gl.useProgram(program);
    gl.clear(gl.COLOR_BUFFER_BIT | gl.DEPTH_BUFFER_BIT); //
    mat4.identity(cameraMat);
    mat4.translate(cameraMat, cameraMat, [translateX, translateY, translateZ]);
    mat4.rotateX(cameraMat, cameraMat, rotateX);
    mat4.rotateY(cameraMat, cameraMat, rotateY);
    mat4.rotateZ(cameraMat, cameraMat, rotateZ);

    mat4.invert(cameraMat, cameraMat);

    gl.uniformMatrix4fv(uWorldLoc, false, worldMat);
    gl.uniformMatrix4fv(uViewInvLoc, false, cameraMat);
    gl.drawArrays(gl.TRIANGLES, 0, pointPos.length / 3);
};效果如下图所示,你可以拖动控制条来操纵相机。注意:这里的 translateX等表示的不是立方体的位移了,而是相机的位移!
TranslateX
TranslateY
TranslateZ
RotationZ
RotationY
RotationX
像上面的实例中,直接的操作相机的位移和旋转位置似乎是没什么问题。但是有是有利用旋转和平移来让相机“看向”我们期望的目标似乎并不是一件容易得事情。例如你想让相机看向某个特定的目标。你又要如何去计算相机的位移和旋转角度呢?
所以我们需要学习下面这个方法。
Look At
改方法在很多库中叫做:lookAt它表示让相机看向某一个目标。首先,我们需要知道相机在世界坐标系中的位置(cameraPos),同时,我们也需要知道相机看向的目标在世界坐标系中的位置(targetPos)。
事实上,我们不一定强制要求相机和其看向的目标在世界坐标系中的坐标,实际上,只需要这两个目标处于同一坐标系下即可,不一定是世界坐标系。
接下来我们要做的事情,就是利用上述的条件来构建相机所在世界中间中的矩阵。其核心思想是:利用相机在世界空间中的位置和观察目标的位置,经过一系列的计算,可以计算出相机坐标系在世界空间中的方向。利用这些向量,我们可以构建其矩阵。
现在我们来看一下是如何计算相机在世界空间中各个坐标系的方向的:
- 首先,最容易计算的是相机的 z 轴,我们利用相机的位置减去观察目标的位置即是相机 z 轴的方向。
- 接下来,我们计算 X 轴的方向。此时,我们需要先假设一下相机的 Y 轴方向(一般假设为竖直向上)。我们可以通过 Z 轴与假定的 Y 轴方向叉乘(使用右手定则)来确定 X 轴的方向:
- 最后,就是计算真正的 Y 轴方向了,依然是利用右手定则:
最终,我们得到了 这三个向量,它们分别表示相机的 x、y、z 轴在世界空间中的向量,那么我们根据这三个向量可以构建相机在世界空间的变换矩阵为:
上述公式中的 表示的是相机在世界空间中的位移。有了该矩阵后,我们再对其求逆,就可以将世界空间中的坐标转换到观察空间中了。
我们可以编写一个函数 lookAt 来得到这个矩阵。
ts
export function lookAt(cameraPos: vec3, targetPos: vec3): mat4 {
    const z = vec3.create();
    const y = vec3.fromValues(0, 1, 0);
    const x = vec3.create();
    vec3.sub(z, cameraPos, targetPos);
    vec3.normalize(z, z);
    vec3.cross(x, y, z);
    vec3.normalize(x, x);
    vec3.cross(y, z, x);
    vec3.normalize(y, y);

    // prettier-ignore
    return mat4.fromValues(
        x[0], x[1], x[2], 0,
        y[0], y[1], y[2], 0,
        z[0], z[1], z[2], 0,
        cameraPos[0], cameraPos[1], cameraPos[2], 1
    );
}在下面的 demo 中,你能发现,我们在移动相机位置时,我们的相机始终都看向了立方体的方向。
TranslateX
TranslateY
TranslateZ
总结
今天我们从为什么要使用相机到后面讲解的lookAt方法,学习了相机的起源及其基本的用法。
相机这一概念将会贯穿整个 3D 开发流程,请务必要搞懂这一章节!
如果觉得本文有用,可以请作者喝杯咖啡~


ts
const canvas = document.getElementById('canvas3') as HTMLCanvasElement;

const gl = canvas.getContext('webgl');
if (!gl) {
    return null;
}

// 设置清空颜色缓冲区时的颜色
gl.clearColor(1.0, 1.0, 1.0, 1.0);

// 清空颜色缓冲区
gl.clear(gl.COLOR_BUFFER_BIT);

// 顶点着色器
const vertexShader = `
    attribute vec4 a_position;
    attribute vec3 a_color;
    uniform mat4 u_world;
    uniform mat4 u_viewInv;
    uniform mat4 u_proj;
    varying vec3 v_color;
    void main () {
        gl_Position = u_proj * u_viewInv * u_world * a_position;
        v_color = a_color;
    }
`;
// 片元着色器
const fragmentShader = `
    // 设置浮点数精度
    precision mediump float;
    varying vec3 v_color;
    void main () {
        // vec4是表示四维向量,这里用来表示RGBA的值[0~1],均为浮点数,如为整数则会报错
        gl_FragColor = vec4(v_color, 1.0);
    }
`;

// 初始化shader程序
const program = initWebGL(gl, vertexShader, fragmentShader);
if (!program) {
    return null;
}
// 告诉WebGL使用我们刚刚初始化的这个程序
gl.useProgram(program);
gl.enable(gl.DEPTH_TEST);
const width = 50;
const height = 50;
const depth = 50;
//prettier-ignore
const pointPos = [
    // front-face
    0, 0, 0, width, 0, 0, width, height, 0, width, height, 0, 0, height, 0, 0, 0, 0,
    // back-face
    0, 0, depth, width, 0, depth, width, height, depth, width, height, depth, 0, height, depth, 0, 0, depth,
    // left-face
    0, 0, 0, 0, height, 0, 0, height, depth, 0, height, depth, 0, 0, depth, 0, 0, 0,
    // right-face
    width, 0, 0, width, height, 0, width, height, depth, width, height, depth, width, 0, depth, width, 0, 0,
    // top-face
    0, height, 0, width, height, 0, width, height, depth, width, height, depth, 0, height, depth, 0, height, 0,
    // bottom-face
    0, 0, 0, width, 0, 0, width, 0, depth, width, 0, depth, 0, 0, depth, 0, 0, 0,
];

for (let i = 0; i < pointPos.length; i += 3) {
    pointPos[i] += -width / 2;
    pointPos[i + 1] += -height / 2;
    pointPos[i + 2] += -depth / 2;
}

//prettier-ignore
const colors = [
    1, 0, 0, 1, 0, 0, 1, 0, 0, 1, 0, 0, 1, 0, 0, 1, 0, 0,
    1, 1, 0, 1, 1, 0, 1, 1, 0, 1, 1, 0, 1, 1, 0, 1, 1, 0,
    1, 0, 1, 1, 0, 1, 1, 0, 1, 1, 0, 1, 1, 0, 1, 1, 0, 1,
    0, 0.5, 1, 0, 0.5, 1, 0, 0.5, 1, 0, 0.5, 1, 0, 0.5, 1, 0, 0.5, 1,
    0, 0, 1, 0, 0, 1, 0, 0, 1, 0, 0, 1, 0, 0, 1, 0, 0, 1,
    0, 1, 1, 0, 1, 1, 0, 1, 1, 0, 1, 1, 0, 1, 1, 0, 1, 1,
    0, 1, 0, 0, 1, 0, 0, 1, 0, 0, 1, 0, 0, 1, 0, 0, 1, 0,
]
const buffer = gl.createBuffer();
gl.bindBuffer(gl.ARRAY_BUFFER, buffer);
gl.bufferData(gl.ARRAY_BUFFER, new Float32Array(pointPos), gl.STATIC_DRAW);

const colorBuffer = gl.createBuffer();
gl.bindBuffer(gl.ARRAY_BUFFER, colorBuffer);
gl.bufferData(gl.ARRAY_BUFFER, new Float32Array(colors), gl.STATIC_DRAW);

gl.bindBuffer(gl.ARRAY_BUFFER, buffer);
// 获取shader中a_position的地址
const a_position = gl.getAttribLocation(program, 'a_position');
// 我们不再采用这种方式进行传值
// gl.vertexAttrib3f(a_position, 0.0, 0.0, 0.0);
// 采用vertexAttribPointer进行传值
gl.vertexAttribPointer(
    a_position,
    3,
    gl.FLOAT,
    false,
    Float32Array.BYTES_PER_ELEMENT * 3,
    0
);
gl.enableVertexAttribArray(a_position);

gl.bindBuffer(gl.ARRAY_BUFFER, colorBuffer);
const a_color = gl.getAttribLocation(program, 'a_color');
// 我们不再采用这种方式进行传值
gl.vertexAttribPointer(
    a_color,
    3,
    gl.FLOAT,
    false,
    Float32Array.BYTES_PER_ELEMENT * 3,
    0
);
gl.enableVertexAttribArray(a_color);

// 我们需要往shader中传入矩阵
const uWorldLoc = gl.getUniformLocation(program, 'u_world');
const uViewInvLoc = gl.getUniformLocation(program, 'u_viewInv');

let translateX = 0; //
let translateY = 0; //
let translateZ = 0; //

const uProj = gl.getUniformLocation(program, 'u_proj');
const projMat = mat4.create();
mat4.perspective(projMat, 45, canvas.width / canvas.height, 1, 2000);
gl.uniformMatrix4fv(uProj, false, projMat);

let cameraMat = mat4.create();

const worldMat = mat4.create();

const render = () => {
    gl.useProgram(program);
    gl.clear(gl.COLOR_BUFFER_BIT | gl.DEPTH_BUFFER_BIT); //
    mat4.identity(cameraMat);
    cameraMat = lookAt(
        new Float32Array([translateX, translateY, translateZ]),
        new Float32Array([0, 0, 0])
    );

    mat4.invert(cameraMat, cameraMat);

    gl.uniformMatrix4fv(uWorldLoc, false, worldMat);
    gl.uniformMatrix4fv(uViewInvLoc, false, cameraMat);
    gl.drawArrays(gl.TRIANGLES, 0, pointPos.length / 3);
};

render();ts
export function lookAt(cameraPos: vec3, targetPos: vec3): mat4 {
    const z = vec3.create();
    const y = vec3.fromValues(0, 1, 0);
    const x = vec3.create();
    vec3.sub(z, cameraPos, targetPos);
    vec3.normalize(z, z);
    vec3.cross(x, y, z);
    vec3.normalize(x, x);
    vec3.cross(y, z, x);
    vec3.normalize(y, y);

    // prettier-ignore
    return mat4.fromValues(
        x[0], x[1], x[2], 0,
        y[0], y[1], y[2], 0,
        z[0], z[1], z[2], 0,
        cameraPos[0], cameraPos[1], cameraPos[2], 1
    );
}